Starship Combat Summary
- Equip a starship with weapon modules and activate them.
- Get close to a target and achieve lock-on.
- Trigger your weapon modules to open fire.
- When the enemy does the same to you, deploy repair bots to repair your ship components.
- Blast through their shields and hull and BOOM goes your enemy.
Weapon Modules
Weapon modules - you can read more about them along with the basics of starships here - are a subset of general ship modules. You acquire starship weapon modules either through drops from taking out NPC (non-player character) starships and players with the appropriate tradeskill will also be able to produce some of them.
Once you have modules installed, the next step to attacking anything with your starship is to turn on the weapon modules.
Activated modules may use some of your ship's shipsim cycles and/or your ship's power. You'll probably typically have your most important modules on most or all of the time.
Weapon modules can, broadly, be divided into two types: missile and cannon. You can load different kinds of missiles in your missile modules, and employ different kind of ammo batteries in your cannons. The major difference between the two is in when you can use them. Cannons (which could be anything from railguns to high-velocity autocannons) can be fired at something that is something around a 150° arc in front of you, whereas missiles (which are all homing missiles) may be fired from any direction, but only after you've achieved lock-on.
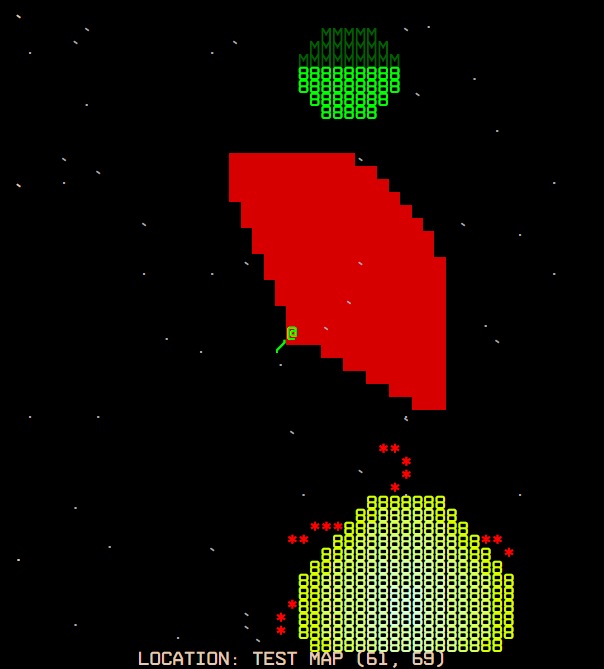
A ship with its cannon target cone in red.
Damage Types
Depending on the type of missile or ammo battery you're using, there are four types of damage in starship combat. Further, each damage type has a % chance of having a non-damage effect on an enemy ship, with different effects for missiles vs cannons:
- Kinetic - think railguns, for instance. Kinetic damage is more likely to damage/be absorbed by shields vs hulls than other types. Effects here include knocking the enemy ship onto a new heading.
- Thermal - Damage from intense heat, which is more likely to affect the hull than shields. Effects include an increased chance of destroying active repairbots (see below).
- EM - Electromagnetic energy is about equally strong against shields and the hull. Effects include losing target lock.
- Gravitic - Gravity-based weapons are the most hull-oriented weapons. Effects include peeling speed off the vessel.
Typically, if a weapon leans hull or shield oriented, it means that it will be less effective against the opposite. So, using weapons that are mostly effective against the hull on shields would be less practical than using shield-specific weapons to take down someone's shield before opening up with hull-shredding weapons.
Weapon Ranges
All weapons have a particular range within which that weapon can be maximally effective. Outside of that range, each weapon has a different fall-off rate. Some might very quickly stop doing any damage outside of that range, some see their damage fall-off much more slowly.
Achieving Target Lock-On
How you approach hitting a target with your weapons depends on whether it's cannons or missiles you want to use. With cannons, you have the aforementioned ~150° arc in front of you in which you can hit a target, while with missiles you must first achieve lock-on.
Locking-on is a process of first spotting your enemy and getting within range, and then actually locking-on. How long locking-on takes depends on a few factors:
- The relative size of your ships - the smaller ship can lock on more quickly to the bigger ship than vice-versa.
- The strength of your starship's sensor suite.
- Any defensive measures equipped on the enemy starship.
Once you've locked on, you can fire your missiles at your opponent no matter what direction you're facing relative to them.
Shields
Shields are damage-absorbing barriers that all starships have. However, they don't block all incoming attacks - some can slip through shields. The smaller ship in an encounter has a better chance of slipping attacks through than the bigger ship does.
As a starship's shield is drained, the captain can allocate power to it to replenish it. If the shield goes to zero, it 'breaks' and will take a few seconds before it can come back up. Those are a very very vulnerable few seconds for a starship, as a hull is nowhere near as hearty as a shield.
Ship Damage
What happens when your ship takes damage that's not absorbed by its shield?
First of all, the hull takes damage. If your hull's damage points go to zero, your ship goes boom. You don't want to go boom. It's no fun.
Secondly, your other ship components (distinct from your ship modules) have a chance of being damaged. You can read about the various starship components here.
As your ship components get damaged, your ship may suffer various effects, such as reduced acceleration or disruption to your view of what's around you, but ultimately, what will kill you is your hull's DP (damage points) going to zero.
Which component gets damaged depends on which side of your ship the attack comes from. Different sides of the ship are tied to different components, so what angle you attack (or are attacked) from is consequential in terms of what ship systems might be damaged.
Repair Bots
So what do you do when your ship's components (including the hull) get damaged? Do you cry impotent tears of rage and beat your fists against the walls of your command bridge?
Well, maybe, if that's the kind of weak-kneed spacer you are, but here at Starmourn HQ we hope that you're made of sterner stuff. Assuming you are, on your ship receiving damage, you'll want to calmly deploy repair bots to repair that component, if you have them.
In short, repair bots take up cargo space in your hold. They use what are called 'repair kits', which also take up cargo space, to repair your ship. Kits get used up as they repair Damage Points. You can have as many bots and repair kits as you can fit, but it's at the expense of the other things that take up cargo space (linear drives, weapon modules, fuel cores, ammo batteries, missiles, etc).
If you have repair bots set to manually deploy, you'll direct these repair bots to whatever component you want repaired, where they'll sit, repairing X Damage Points/second and using up repair kits. You can order them to another ship component, and they'll scuttle on over there, but it'll take some time. It'll take more time on bigger ships, less time on smaller ships.
If you have repair bots set to automatically deploy, your shipsim will direct the bots to the most damaged component for repair. This may, however, be less efficient in some cases than handling repair bot deployment manually, since in the automatic method they may switch between components more often and so endure more travel time between them.
While repair bots don't break or decay on their own, while they're deployed they are vulnerable to being damaged and destroyed by weapon strikes.
To read about what happens when a ship dies, and how you replace it, check out the Ship Destruction and Replacement page.
Think we're pretty cool? Tell your friends!